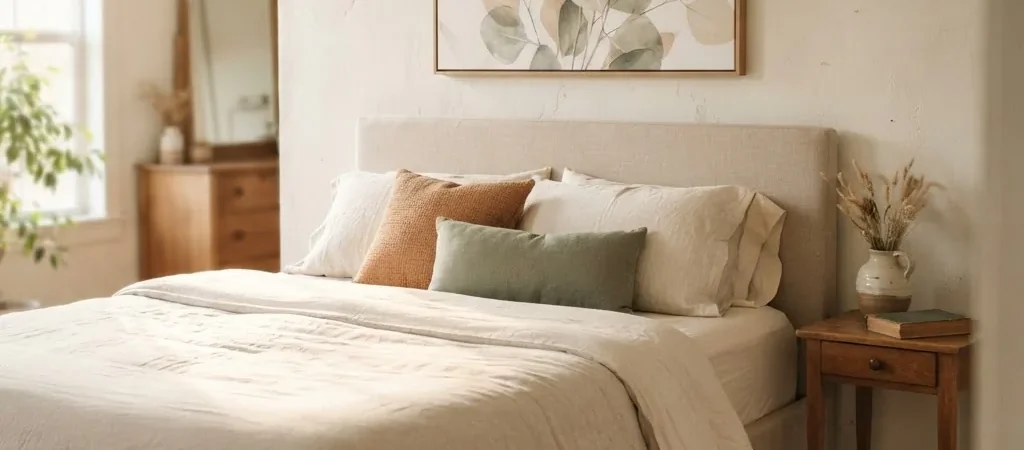
There is a specific kind of blank wall that bothers people more than any other wall in the house. It is the one directly above the bed.
You walk into your bedroom, and that wall is the first thing you see. You lie down at night, and it is the last thing you see before the light goes out. If it is just flat paint and nothing else, there is a low-level visual unease to it. Nothing dangerous, nothing urgent, just this quiet sense that the room is unfinished. Like a sentence with no period.
I have been decorating rentals long enough to know that above-the-bed is the spot that paralyzes people the most. Not because it is complicated, but because it feels high-stakes. The wrong thing in the wrong size looks worse than nothing at all. And when you are working with a budget, or you are not allowed to put holes in the walls, or your bedroom is small enough that every choice is amplified, the stakes feel even higher.
This guide is going to walk you through the real options, with honest sizing guidance, budget-friendly takes, and renter-safe hanging methods included throughout. By the end, you will know exactly what you want to try and how to actually do it.
Why Above the Bed Is Worth Getting Right:
A good focal wall at the head of a bed does something quiet but powerful for a room. It creates a visual anchor. It makes the bed feel intentional. It signals that someone actually lives here and cared enough to make it feel like home. You do not need to spend a lot to get that effect. You just need to make a deliberate choice and execute it with a little bit of attention to scale and placement.
The two most common mistakes are: choosing something too small (a single 8×10 print above a queen bed vanishes into the wall), and hanging things too high (art floating a foot above the headboard looks disconnected and strange). Both of these are easy to avoid once you know the sizing rules, so let’s start there before we get into the actual ideas.
The One Sizing Rule You Actually Need:
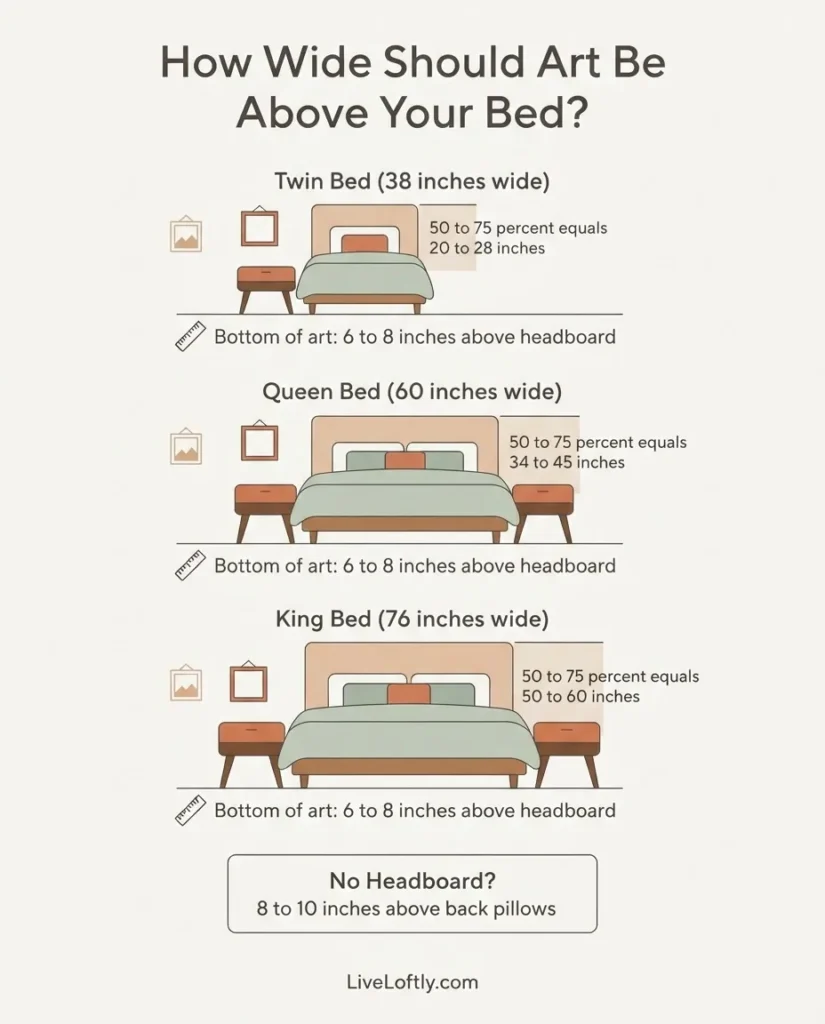
Everything else in this article becomes easier once you know this. Your art or decor arrangement above the bed should span somewhere between 50% and 75% of the width of your bed or headboard. For a twin bed that is about 38 inches wide, you are looking for something in the 20 to 28 inch range. For a queen bed at 60 inches wide, your target is roughly 34 to 45 inches. For a king bed at 76 inches wide, something in the 50 to 60 inch range anchors the space well.
The art sizing guide from ArtHouse SF breaks down the queen bed in particular with good detail, and the principle holds for all bed sizes. The formula matters because too narrow and the art looks like an afterthought.
Too wide and it overwhelms the headboard and creates a top-heavy wall.
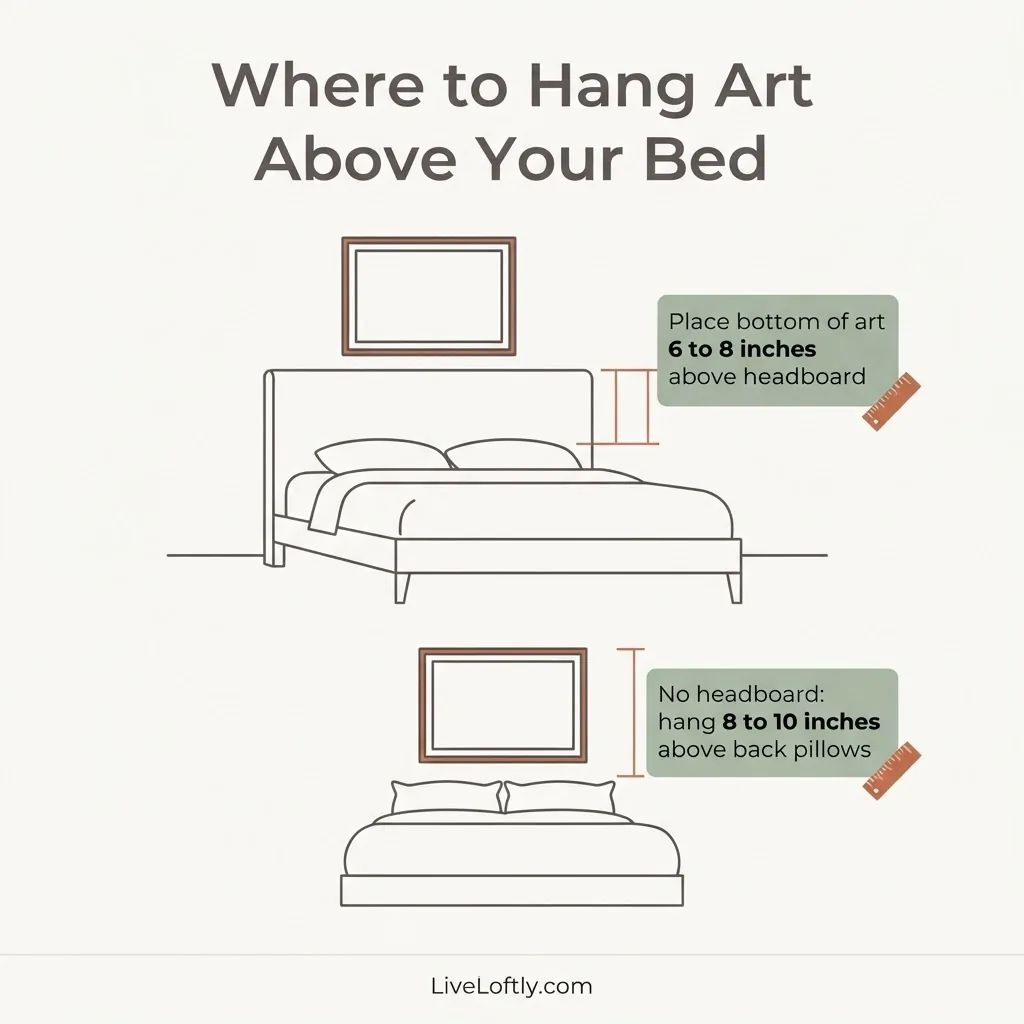
For hanging height, the bottom edge of whatever you are hanging should sit 6 to 8 inches above the top of your headboard. If you have no headboard, measure 8 to 10 inches above your back pillows. This keeps the art visually connected to the bed rather than floating off in its own separate world.
Now, the ideas.
Idea 1: One Large Horizontal Canvas
This is the simplest option and often the best one. A single wide horizontal canvas print in the right size anchors the bed immediately, with no measuring, arranging, or second-guessing required. For a queen bed, look for something in the 36 to 48 inch range. For a king, you can go wider, up to 60 inches, without it feeling overpowering.
The subject matter matters for a bedroom. Abstract art with soft color palettes, landscape photography, botanical prints, and simple watercolors all tend to create a calmer feeling in a sleep space than busy patterns or high-contrast graphic art. This is not a rule. It is a practical observation. A bedroom wall is the last thing your brain processes before rest. Soft, quiet imagery earns its place there.
Budget reality: you can find good canvas prints in the 36-48 inch range for $30 to $80 at places like Society6, Minted, or even a local print shop if you have a digital file you love. The price range goes much higher for original art, but for a renter or a first apartment, a quality print in a simple frame or on a stretched canvas is more than good enough.
Idea 2: A Gallery Wall Above the Bed
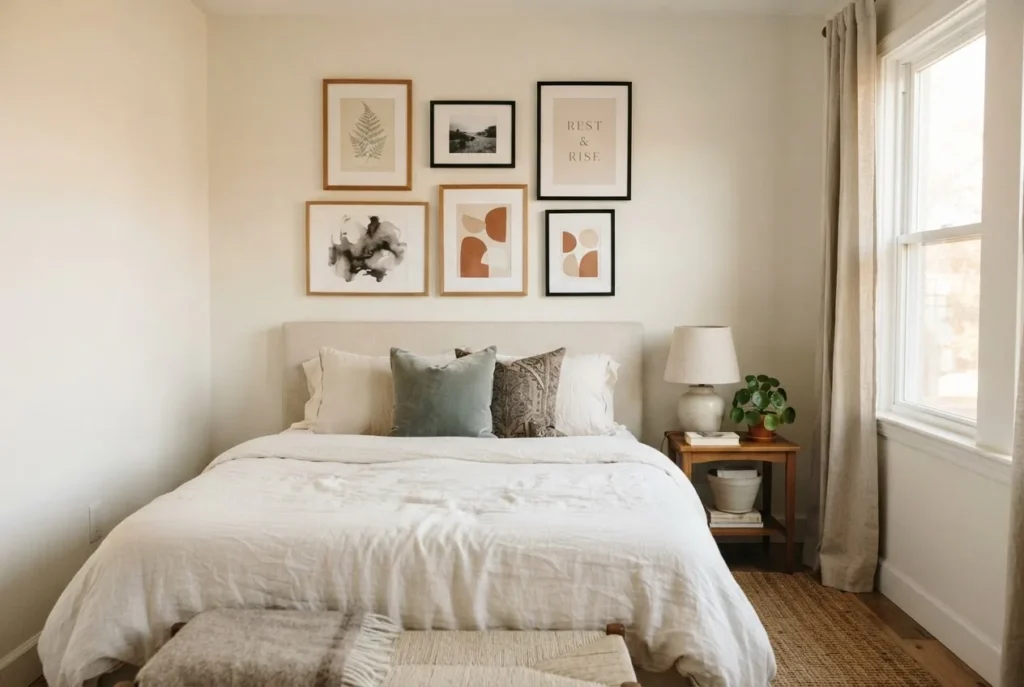
A gallery wall sounds intimidating but it is genuinely forgiving once you understand the basic rules. The key rule is this: your gallery arrangement should read as one unified shape, and that shape should follow the same 50-75% width guideline as a single piece.
A good starting point is a grid arrangement, three frames of the same size in a horizontal row, or a 2×3 grid of identical frames. This is the easiest to execute and the most beginner-friendly. If you want something with more personality, a loose organic cluster with a mix of sizes works beautifully, but it requires a bit more planning upfront.
For spacing between frames, 2 to 3 inches is the standard. Any closer and the frames feel crammed together. Any farther apart and they stop reading as a group and start reading as scattered individual pieces. The team at Spoak’s art hanging guide frames this well: pieces should be close enough to feel like part of the whole arrangement while still being distinct from each other.
A trick I have used many times is to trace each frame on paper, cut out the shapes, and tape them to the wall with painter’s tape before committing to anything.
It takes maybe ten minutes and saves a lot of unnecessary holes or strip marks.
Idea 3: A Tapestry or Woven Textile
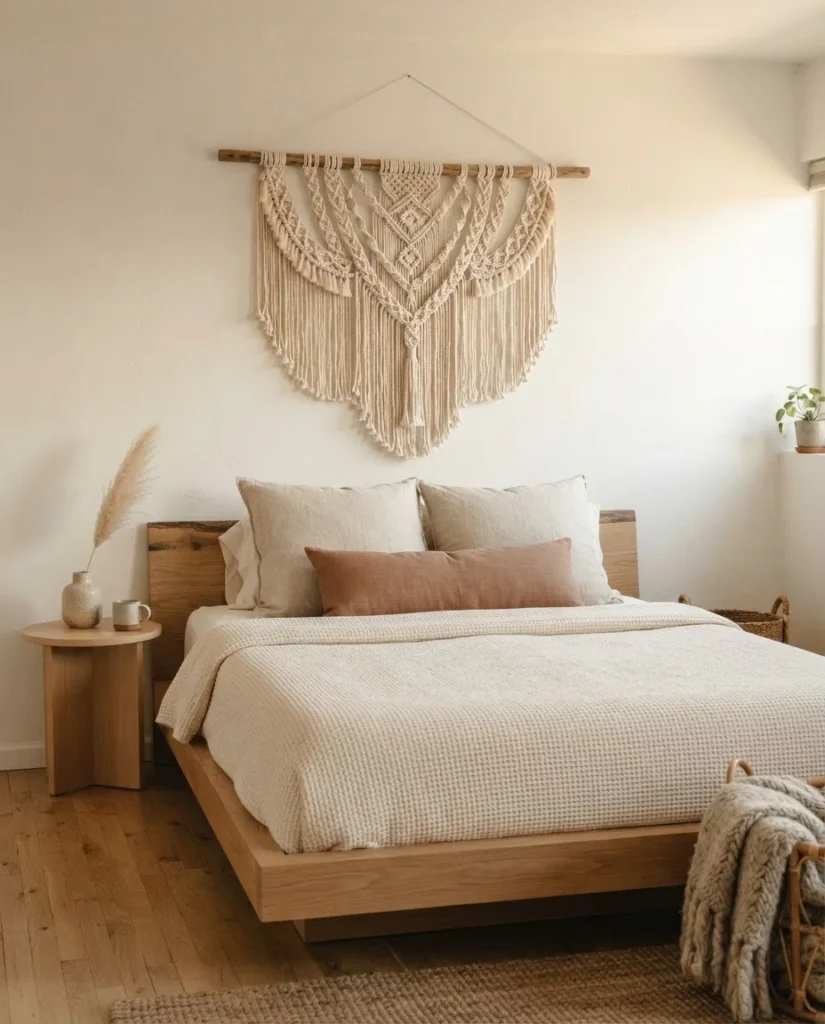
A tapestry is one of the most renter-friendly options on this list. They are lightweight, they cover a lot of wall space for very little money, they add instant texture and warmth, and they can be hung without a single nail.
Boho-style woven tapestries with soft neutral patterns have become popular enough that they are now widely available. But tapestries also work beautifully in a more minimal bedroom as a large flat wash of texture, or in a coastal room as a linen-weave piece in a natural tone. They read differently depending on the rest of the room.
For hanging without hardware, a fabric loop-top tapestry can slide right onto a decorative wooden dowel hung on two adhesive hooks.
A Velcro strip along the top edge is another renter-approved method that holds well on smooth walls. For larger, heavier tapestries, Command’s large hooks handle up to 5 pounds each, which covers most standard fabric wall pieces.
Idea 4: Macrame
Macrame sits at the intersection of texture and art, which is why it works so well above a bed. A well-made macrame piece brings visual depth, tactile interest, and a softness that canvas art does not have. It also moves slightly with air circulation, which adds a quiet liveliness to a room without any visual noise.
The sizing principle still applies here. A macrame piece that spans roughly two-thirds the width of your bed feels proportional. A narrow piece centered above a king bed will look lost no matter how beautiful the knotwork is.
On budget: handmade macrame from independent sellers on Etsy is genuinely lovely but starts around $60 to $80 for something bed-sized. Mass-produced macrame from larger retailers runs $20 to $45. The quality difference is visible up close but less obvious from across a room. Worth knowing both options exist.
Idea 5: A Single Large Mirror
A mirror above the bed is a polarizing choice. Some people love the light-bouncing effect and the way it makes a small room feel larger. Others find the idea of sleeping underneath a mirror unsettling (and if you are one of those people, trust that feeling, no design rule should override what makes you feel comfortable in your own bedroom).
If you go this route, proportion and weight matter especially. A round or arched mirror in the 24 to 36 inch diameter range is the sweet spot for most beds. Rectangular mirrors work too but can look more formal. Whatever you choose, use proper wall anchors through studs or very high-rated adhesive strips rated for the actual weight of the mirror. The Decorating Den guide on hanging art above a bed makes a point worth repeating: never hang sharp, heavy objects above where you sleep using anything less than secure, appropriate hardware.
Idea 6: Floating Shelves With Styled Objects
Floating shelves above the bed turn the wall into something functional and decorative at the same time. A set of two shelves, one centered above the headboard and one slightly lower, lets you display small plants, art books, a candle, a vase, a framed photo, and other objects in a curated arrangement that feels personal and lived-in.
The key is restraint. A shelf above the bed works best when it is intentionally edited: a few meaningful objects with space between them, rather than a crowded row of stuff. Clutter above the bed creates visual noise right before sleep, which is the opposite of what we are going for here.
For renters, floating shelf brackets with high-weight-rated adhesive strips are an option for light shelves holding light objects. For anything heavier, you are looking at a real wall anchor, which means checking whether your lease allows small holes. In most rentals, a spackled nail hole at move-out is forgiven. A 3-inch toggle bolt is a different story.
Idea 7: Sconces on Either Side
Wall sconces flanking a bed are one of those things that look like they belong in a boutique hotel and actually work in a regular apartment. They are practical (reading light, bedside light without a bulky lamp), and they define the head of the bed in a way that makes the whole room feel more intentional.
The renter-friendly version is a plug-in sconce. These mount to the wall with only two small screws, have a cord that drapes down behind the nightstand or bed frame, and look almost identical to hardwired sconces from any normal distance. They are genuinely beautiful in a bedroom and they do not require an electrician.
You do not need art above the bed at all if you have sconces. Two well-placed sconces with the right shade shape frame the bed and create a warm pool of light that is its own kind of decor.
Idea 8: A Triptych (Three Matching Prints)
A triptych is three prints or panels in the same aesthetic, hung side by side with uniform spacing. It is a good middle ground between the commitment of one large piece and the complexity of a full gallery wall.
The prints can be three parts of one continuous image (a panoramic landscape split into thirds), or three separate but coordinating pieces in the same color palette and style. The coordinating approach is more flexible because you can source the three prints individually over time and build the set as your budget allows.
For a queen bed, three 12×16 or 14×18 prints in a row add up to a total arrangement width of roughly 36 to 54 inches, which sits comfortably in the 50-75% target zone. For gallery wall spacing guidance, the Fab-Art size and spacing reference is one of the cleaner breakdowns I have seen, with specific measurements for both single-piece and multi-piece arrangements.
Idea 9: Botanical or Nature Prints
If you are not sure what subject matter to put above the bed, botanical and nature prints are the safest starting point and I mean that in the most genuinely useful way. They work in almost every room style. A fern print is at home in a cottagecore bedroom and in a minimalist Scandinavian-leaning bedroom. A calm landscape photograph works in a coastal room and a modern neutral room. There is almost no style that rejects nature imagery because nature imagery tends to be inherently restful.
For a budget-friendly version, a set of three coordinating botanical prints in simple matching frames looks intentional and can be built for under $40 using printable art files and inexpensive poster frames. This is one of those spots where going cheap on the prints is fine as long as you are consistent with the framing.
Idea 10: Pressed Flower or Dried Botanical Art
Pressed and dried botanicals framed behind glass are having a sustained moment in home decor, and they earn it. A large pressed flower print or a framed arrangement of dried eucalyptus or pampas brings a natural, handcrafted quality that feels genuinely warm without being kitschy.
You can make these yourself if you are patient and have a flower press, or you can find them on Etsy in a wide range of sizes. A 16×20 framed pressed botanical from an independent seller typically runs $25 to $60. At that price point it is genuinely worth-it category for above the bed.
Idea 11: Peel-and-Stick Wallpaper as an Accent Panel
This one surprises people but it has become one of my favorite above-bed solutions for renters. Instead of art, you apply a panel of removable peel-and-stick wallpaper to the wall above and behind the headboard, creating a soft patterned backdrop that essentially functions as a headboard and a focal wall in one.
This works especially well in rooms without a traditional headboard. A panel roughly 60 to 72 inches wide and 30 to 36 inches tall, applied flush to the wall above where the headboard would be, creates an instant defined focal point.
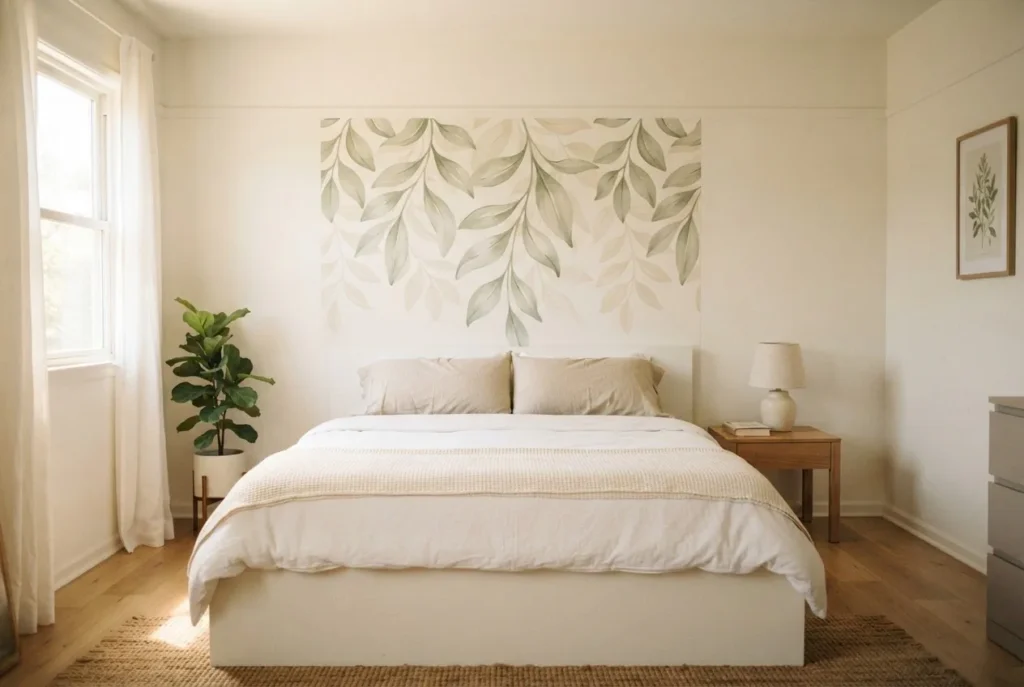
For a more headboard-like look, you can take the panel all the way from the floor to the top of where the headboard would be, framing the bed area completely.
Good removable wallpaper comes off cleanly from painted walls without damage when applied and removed properly. Tempaper’s removable wallpaper collection is a well-known renter-friendly option with a wide range of patterns. Prices typically run from $2 to $4 per square foot, which puts a standard above-bed panel in the $30 to $65 range depending on the size you need.
Idea 12: String Lights or Fairy Lights as a Soft Backdrop
Hear me out before you write this off as dorm-room decor. A string of warm-white fairy lights arranged in a loose drape or a tight horizontal row above the bed creates a different kind of ambiance entirely at night. Combined with a plain wall or a tapestry behind them, the effect is genuinely warm and intimate in a way that no overhead light can replicate.
This works best as a supplementary layer rather than a standalone piece. String lights alone look great in a dorm. In an adult bedroom, they read better when paired with a tapestry, a gallery wall, or another piece of art that gives the display some daytime substance. At night, the lights do all the work.
The hanging approach for renters is easy: small adhesive hooks rated for 3 to 5 lbs placed 12 to 18 inches apart along the top of the wall section where you want the lights to drape. The Command products weight limits page is worth bookmarking if you hang anything with adhesive strips regularly, because the weight limits differ across product sizes and it is easy to underestimate what you need.
Idea 13: A Single Piece of Textile or Fiber Art
Fiber art, specifically large woven or stitched textile pieces, occupies the same visual territory as a canvas print but with a warmth and texture that flat art cannot match. A large abstract weaving in neutral tones above a bed adds depth and a handmade quality that feels genuinely distinctive in a bedroom full of mass-produced furniture.
The price range for quality fiber art is wider than most. A beautiful handmade piece from an independent textile artist can run $150 to $400 or more, which puts it in the “splurge-selectively” category for most budgets. If you are going to invest more money in one piece of bedroom decor, though, this is a reasonable place to do it. Textile art above the bed reads as a statement piece rather than filler and holds up visually for years.
Idea 14: Personal Photography, Printed Large
One of the most overlooked above-bed options is your own photography, printed big. A single photograph you took of a place you love, a landscape, an architectural detail, a natural scene, printed at 20×30 or 24×36 and framed simply, can look as intentional and personal as anything you would buy.
Services like Artifact Uprising, Mpix, and Chatbooks print high-quality photos at large sizes for $30 to $80 depending on size and finish. If you have a phone photo you love, it is absolutely worth experimenting with. A photo that is personally meaningful to you will always feel more like home than a stock art print, even a beautiful one.
Idea 15: The Intentional Empty Wall
This is the one people never expect to see on a list like this. Sometimes the right above-bed decor choice is nothing at all.
A beautifully made bed, a well-considered headboard, good bedside lighting, and a thoughtfully painted or naturally textured wall can be everything a bedroom needs. Negative space is a real design tool. A blank wall reads as clutter when it is blank because of neglect. It reads as calm and intentional when everything else in the room is deliberately chosen and well-placed.
Before you hang anything, stand back and really look at your room. If your eye finds rest without something on that wall, it is okay to leave it alone. The goal is a room that feels calm, not a room with the most things on it.
Renter-Friendly Hanging: What Actually Works
Since so many of the ideas above require putting something on a wall you cannot permanently alter, here is a straightforward breakdown of the main damage-free methods.
Adhesive picture hanging strips are the most widely used option. Command strips in their large size hold up to 4 pounds per set (4 strips), and their jumbo size holds up to 16 pounds when using the full set of 4 pairs. This covers most lightweight canvas prints, unframed tapestries, and small framed prints well. For anything heavier, you need either multiple sets (and should check the total rated weight carefully) or a real wall anchor. The 3M Command weight limits guide lays out every product in their line, and it is worth checking before you hang anything over a bed.
A tension rod or dowel hung on two adhesive hooks is the cleanest method for tapestries. It keeps the hanging level, prevents drooping at the center, and looks deliberate rather than improvised.
The standard gallery rule for hanging height applies differently above a bed than it does for open walls. Normally the 57-inch eye-level standard (center of art at 57 inches from the floor) guides wall art placement. Above a bed, as Apartment Therapy’s hanging guide explains, the art needs to relate to the furniture below it, not to standing eye height. Six to eight inches above the headboard is the working rule here, and it changes how you measure significantly.
What to Avoid Above the Bed
A few honest “skip it” takes based on what tends to look wrong or cause problems in this specific spot:
Anything too small. A single 8×10 print above a queen bed looks like it got there by accident. Size up before you buy. Many people, including me the first time I styled a shelf, underestimate how scale shifts when something goes on a wall.
Heavy glass-framed art without proper anchoring. If you have a heavy piece with a glass front, make sure it is properly secured into a stud or using hardware rated well above the piece’s actual weight. Above a bed is not the place to rely on a single adhesive hook at the limit of its rated capacity.
Too many competing elements. A gallery wall, a sconce, a floating shelf, and a tapestry all in the same four-foot stretch of wall creates visual noise, not calm. Pick one or two. The editing is the work.
Art that overstimulates at bedtime. This is a genuinely personal call, but very bright colors, high-contrast patterns, or busy abstract compositions can create a subtle restlessness in a sleep space. Not for everyone, but worth considering.
One Last Thing
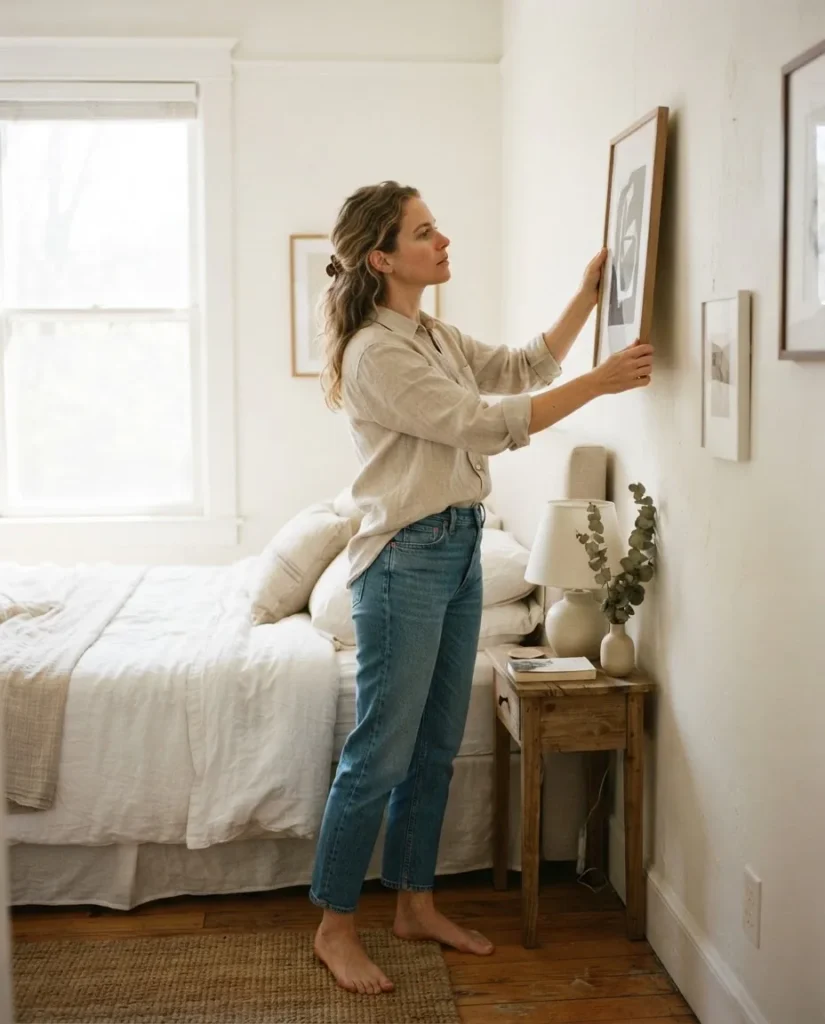
You do not need to get this perfect before you can enjoy your room. The best above-bed decor decision is the one you can actually make, with the budget you have, in the rental you have, this month rather than someday. Start with something you genuinely like. Get the size right. Hang it at the right height.
That is honestly most of the work.
The room will feel different. I have seen it happen too many times to count. One deliberate choice in that spot shifts the whole feeling of the room in a way that is genuinely out of proportion to how small the change is. It is worth doing now.